Android Studioを使ったアプリの制作
1 はじめに
Android OSに対応したアプリ開発には,総合開発環境ソフトウェアである「Android Studio」が配布され,開発の環境が整ってきています。しかし,プログラミングの垣根は高く,プログラムを改編しながら楽しくプログラミングの仕方を学ぶためには,簡単に使えるプログラミングの見本が望まれます。そこで,「Android Studio」を使った「JAVA」言語によるできるだけ短いプログラムを用意しました。手軽に多くの人が利用できるよう,クイズ形式のプログラムになっています。ここでは,工業高校電気系学科で取り組む,電気工事士の資格取得に向けた電気工事の4択の鑑別問題を例としました。このアプリケーションは,問題や画像(写真),選択(4択)の表示と正解,不正解を判断,表示するプログラム構造になっています。これは,電気工事にかかわらず,それぞれのジャンルに合うように改編して利用することを想定しています。変更箇所には,色を付けて示してありますので,改編の参考にしてください。
※ このプログラムは,「Android Studio」を使った「Androidタブレット」のアプリケーションの制作方法を紹介しています。「Android Studio」のシステム構築については,「Androidアプリ開発環境の構築」 を参考にしてください。
※ このコンテンツは,USBデバッグを有効化したアンドロイド端末一台を使用して,アプリの制作を説明しています。
2 アプリケーションの制作手順
最初に初期設定,次にアイコン画像「ic_launcher.png」,問題用画像「pic1.png」,「pic2.png」,「pic3.png」を「drawable」フォルダへコピーします。その後,メインプログラムの「MainActivity.java」,実処理プログラムの「Quest.java」,全体の設定をする「AndroidManifest.xml」を入力することで完成です。見本の画像及びプログラムについては,各項目説明の後にダウンロードできます。
ダウンロードしたものはエクスプローラ上で表示されます。
画像は右クリックし,「名前を付けて画像を保存(S)…」を選んで保存してください。
プログラムは必要な部分を選択し,保存またはコピーしてください。
※ 本コンテンツ上で表示している説明用のプログラムはあくまで説明用で,プログラム用にコピーしても利用できません。実際にプログラムを行う場合は必ずダウンロードして使用してください。
(1) 初期設定の入力
ア 「Android Studio」を立ち上げ,はじめに「File」をクリックし,「New」,「New Project」の順にクリックします。
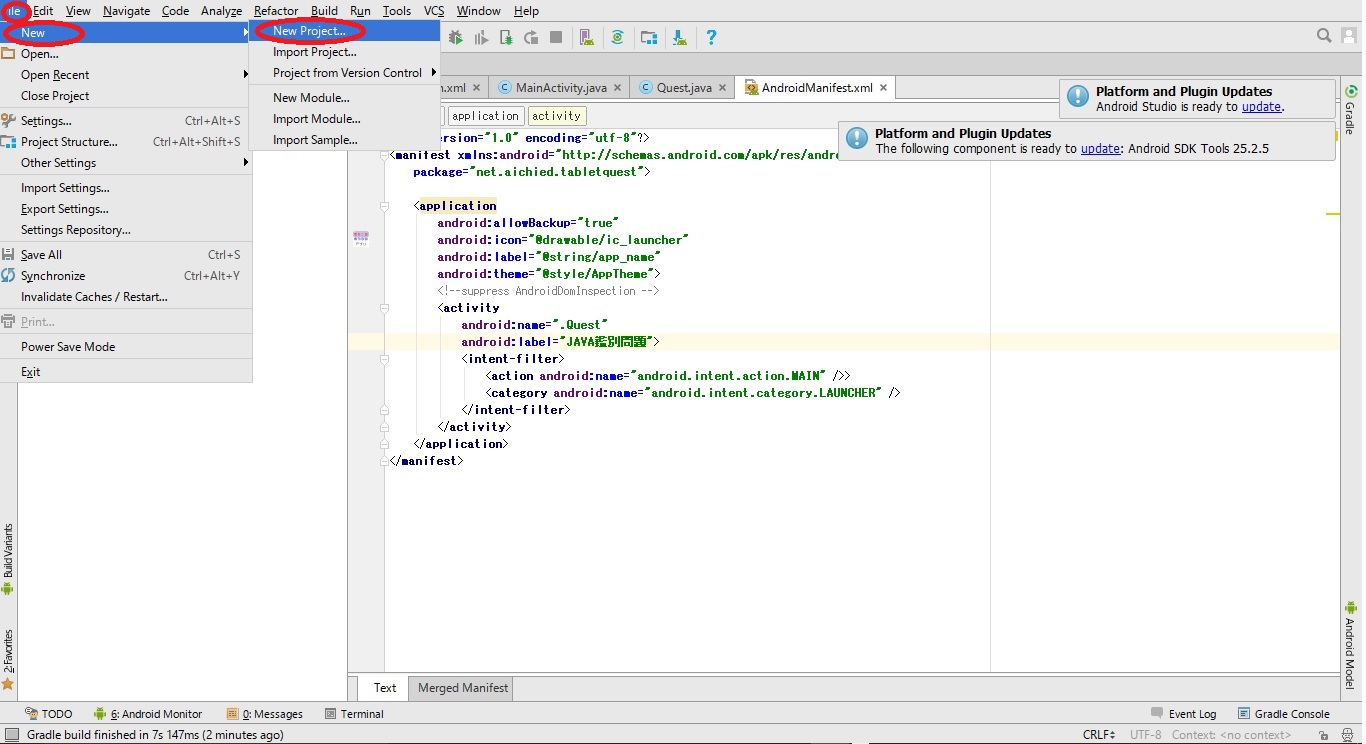
図1 初期設定の入力画面
イ 「Application name」を入力します。
アプリケーションを表す名称にします。ここでは,「TabletQuest」としました。
ウ 次に「Company Domain」を入力します。ここでは,「aichied.net」としました。
エ この画面の「Application name」,「Company Domain」,「Project location」は設定上いろいろな場面で使いますので,記録を残してください。
オ 入力後,「Next」をクリックします。
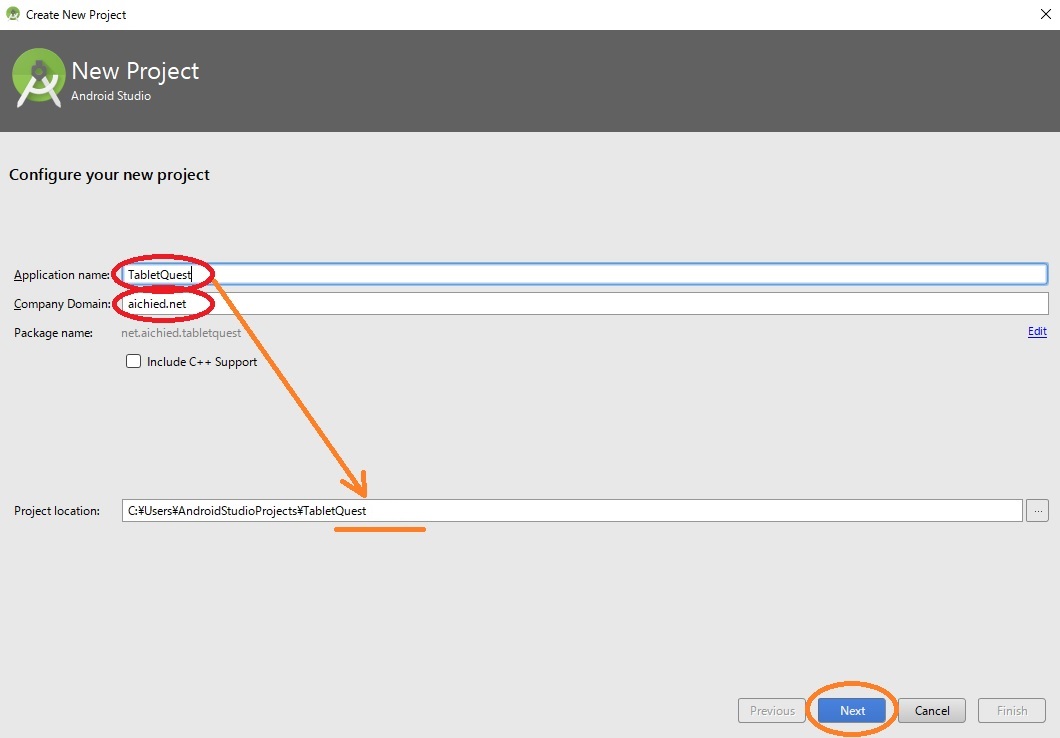
図2 New Project画面
カ 対象とするバージョンを選び,「Phone and Tablet」を選びます。ここでは「API21:Android 5.0(Lollipop)」を選びました。
キ 「Next」をクリックします。
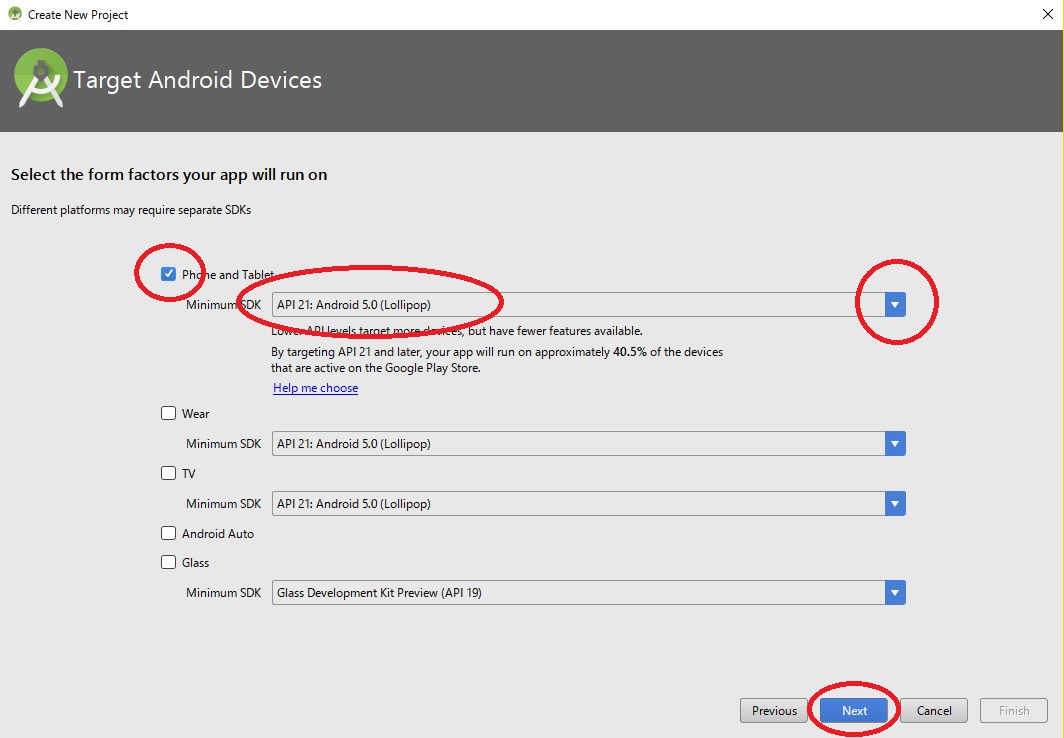
図3 Target Android Devices画面
ク ここでは,「Empty Activity」を選び,「Next」をクリックします。
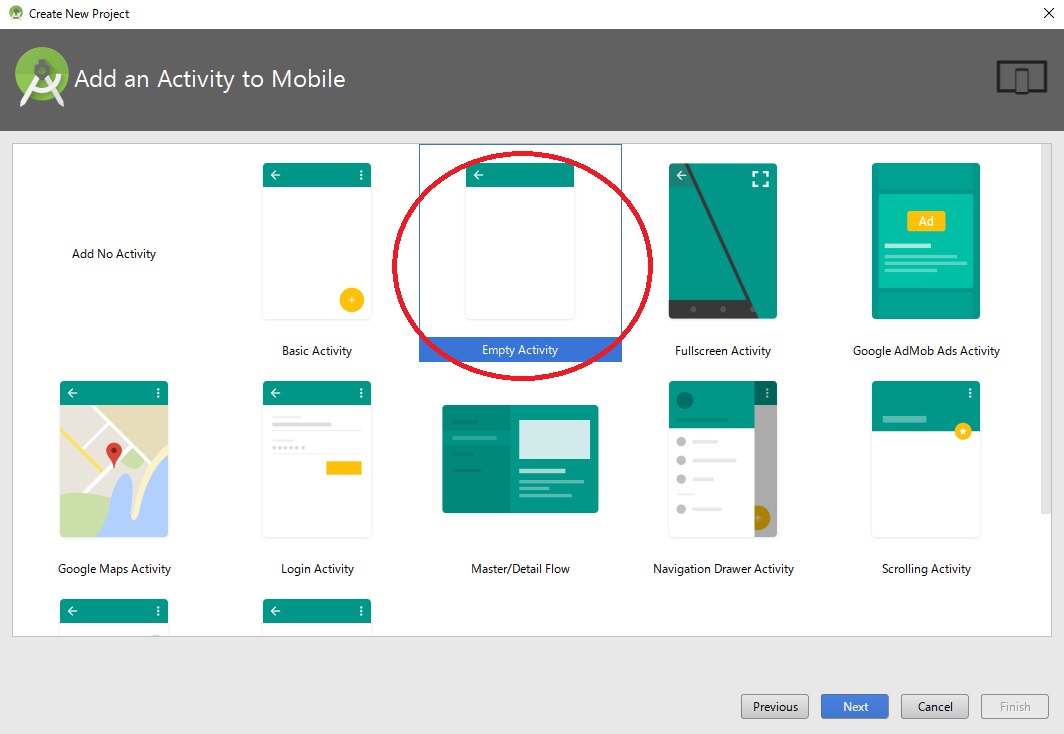
図4 Add an Activity to Mobile画面
ケ 次に,「Activity Name」を入力します。ここでは,標準に表示されている「MainActivity」としました。
コ 次に,「Layout Name」を入力します。ここでは,標準に表示されている「activity_main」としました。
サ 入力後,「Finish」をクリックします。
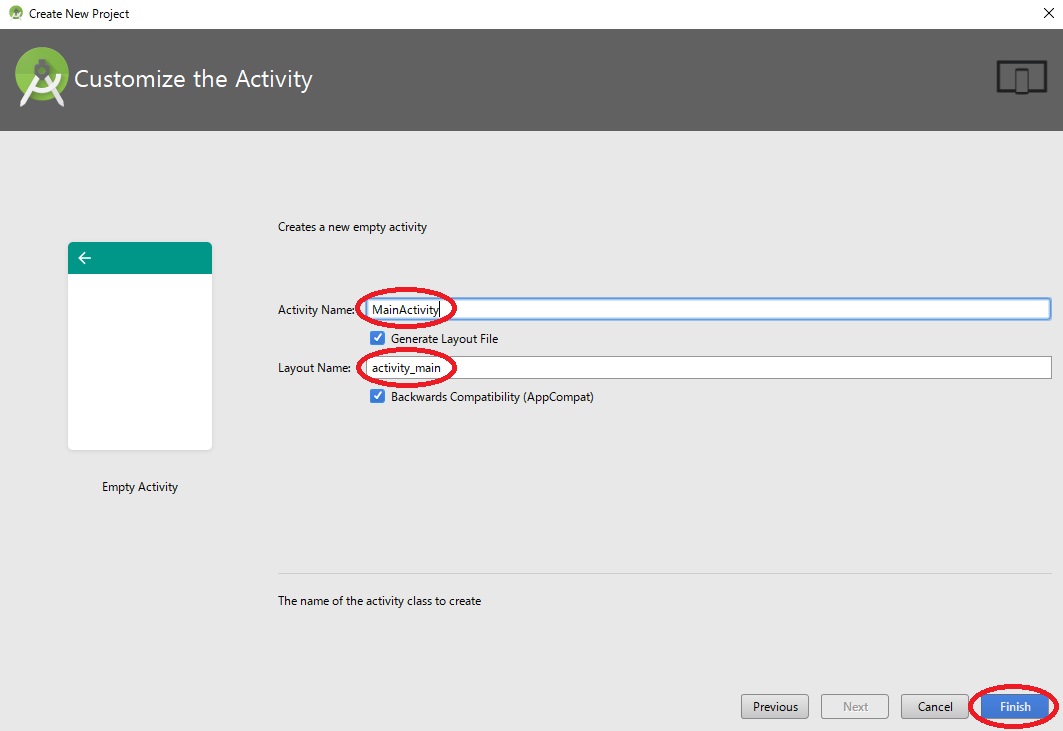
図5 Customize the Activity画面
(2) アイコンと問題用画像のコピー
ア アイコンの画像と問題用画像を
「AndroidStudioProjects¥TabletQuest¥app¥src¥main¥res¥drawable」
にコピーします。
イ あらかじめ,このアプリケーション用のアイコンを作っておきます。ここでは,あらかじめ用意した「ic_launcher」を使いました。
ウ ファイル名「pic0」,「pic1」,「pic2」はあらかじめ使用した問題用のpng形式の画像です。
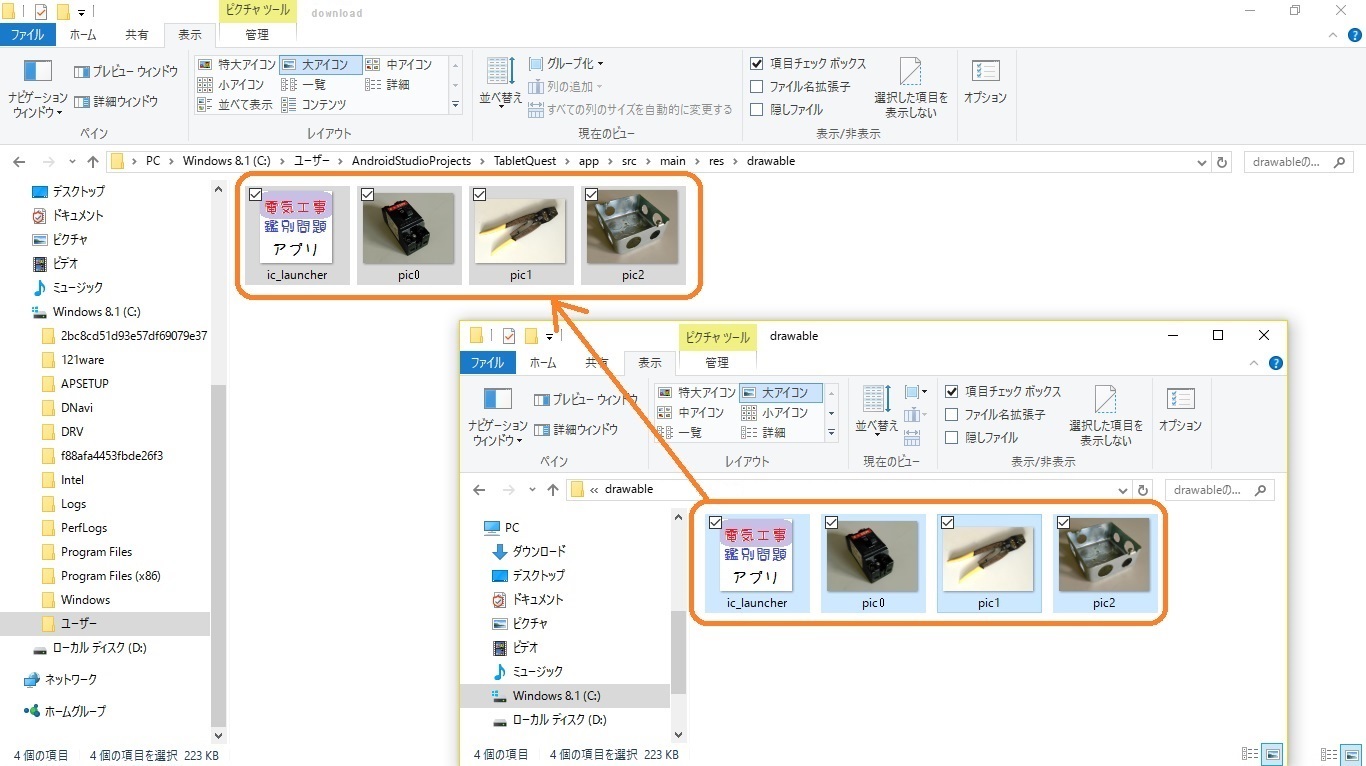
図6 Customize the Activity画面
※ 「AndroidStudioProjects¥TabletQuest」フォルダは,初期設定の最初の画面(図1)下側にある「Project location」で指定しているフォルダです。
(3) メインプログラムの入力
ア メインプログラムである「MainActivity.java」のプログラム画面です。
「¥app¥java¥net.aichied.tabletquest」の下の「MainActivity」をダブルクリックし,プログラムを入力します。
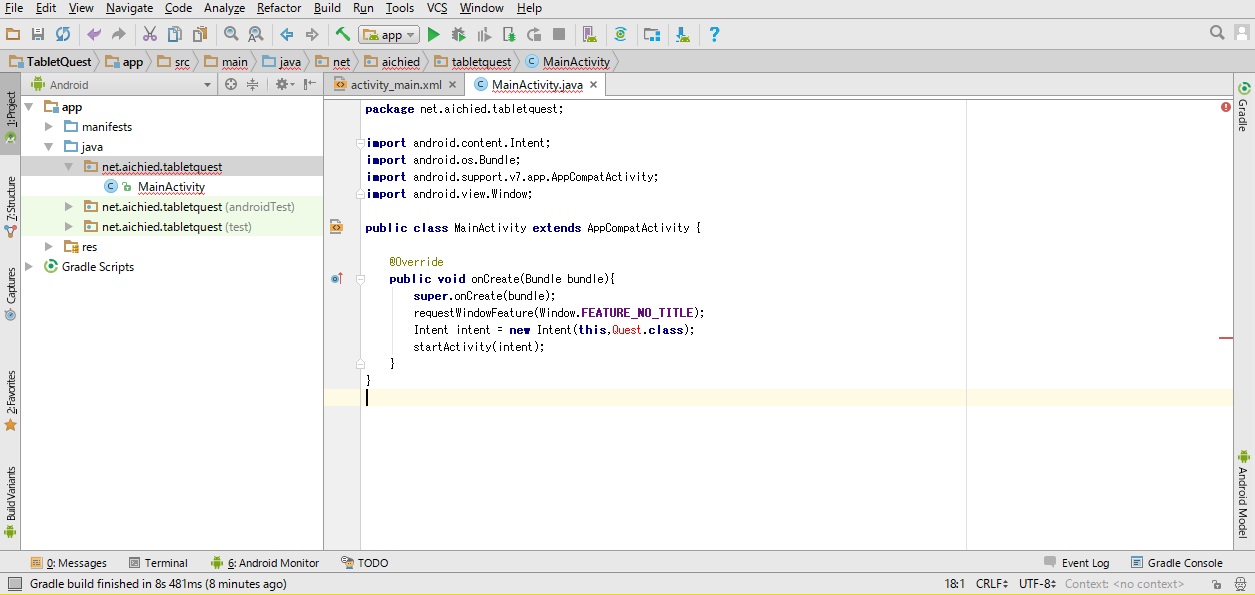
図7 メインプログラム入力画面
イ 「MainActivity.java」プログラム(説明用プログラム)
1行目の「net.aichied.tabletquest」は,初期設定の最初に入力した「Application name」,「Company Dom」です。
![]()
package net.aichied.tabletquest;
import android.content.Intent;
import android.os.Bundle;
import android.support.v7.app.AppCompatActivity;
import android.view.Window;
public class MainActivity extends AppCompatActivity {
@Override
public void onCreate(Bundle bundle){
super.onCreate(bundle);
requestWindowFeature(Window.FEATURE_NO_TITLE);
Intent intent = new Intent(this,Quest.class);
startActivity(intent);
}
}
(4) 実処理プログラムの入力
ア 実処理プログラム(ここでは「Quest.java」)のプログラム画面です。
「¥app¥java¥net.aichied.tabletquest」を右クリックし,「New」,「Java Class」の順にクリックします。
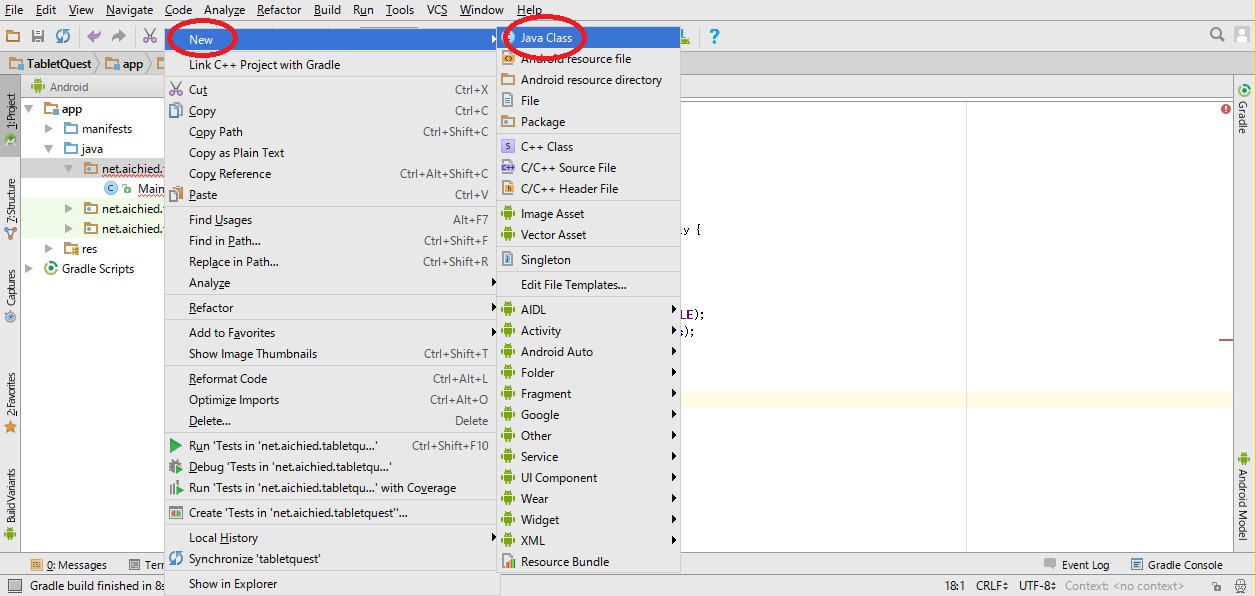
図8 実処理プログラム入力画面
イ 「Create New Class」のダイアログボックスの「Name」に入力(ここでは「Quest」)し,「OK」をクリックします。
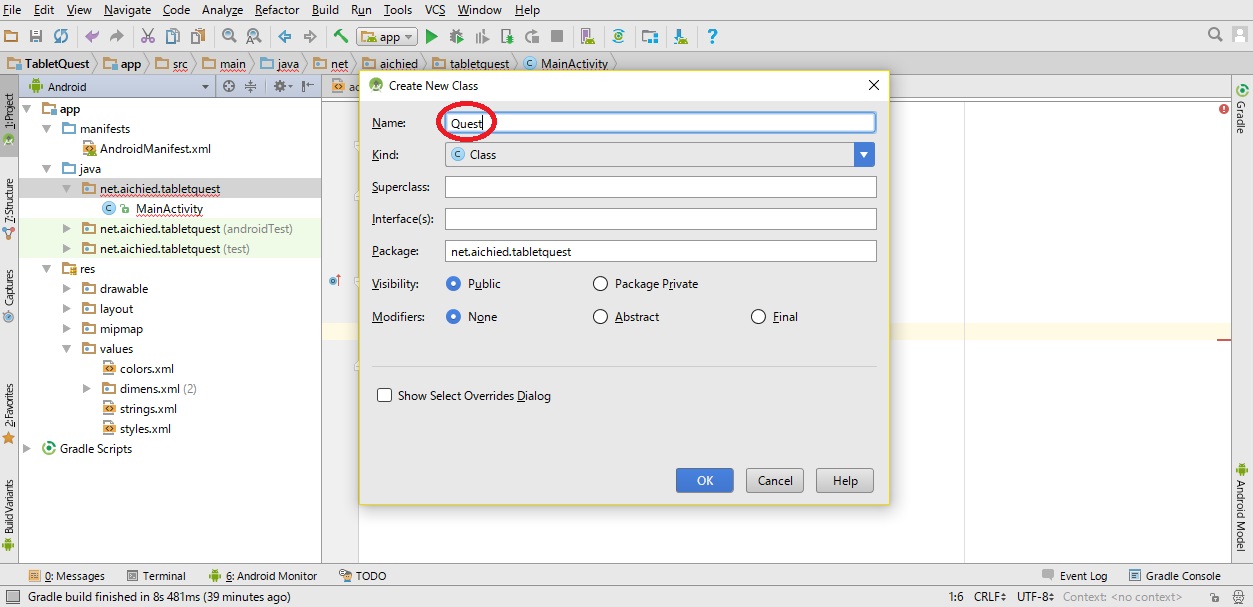
図9 Create New Classダイアログボックス画面
ウ 「net.aichied.tabletquest」の下に「Quest」が表示されるので,表示された「Quest」をクリックし,プログラムを入力します。
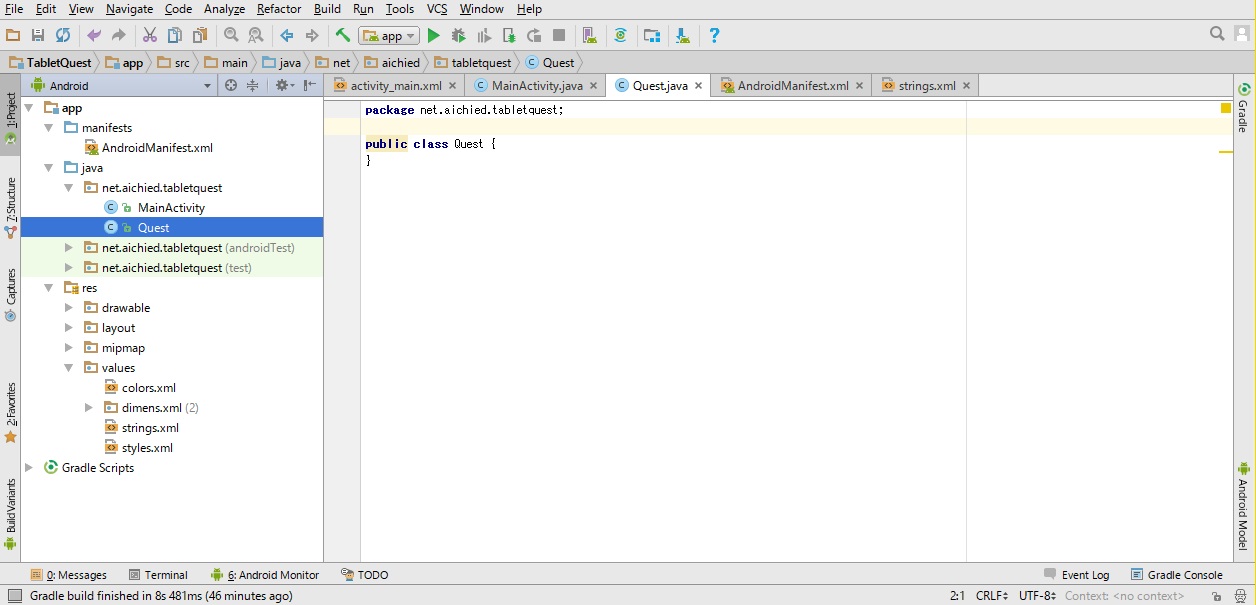
図10 ソースコード入力画面1
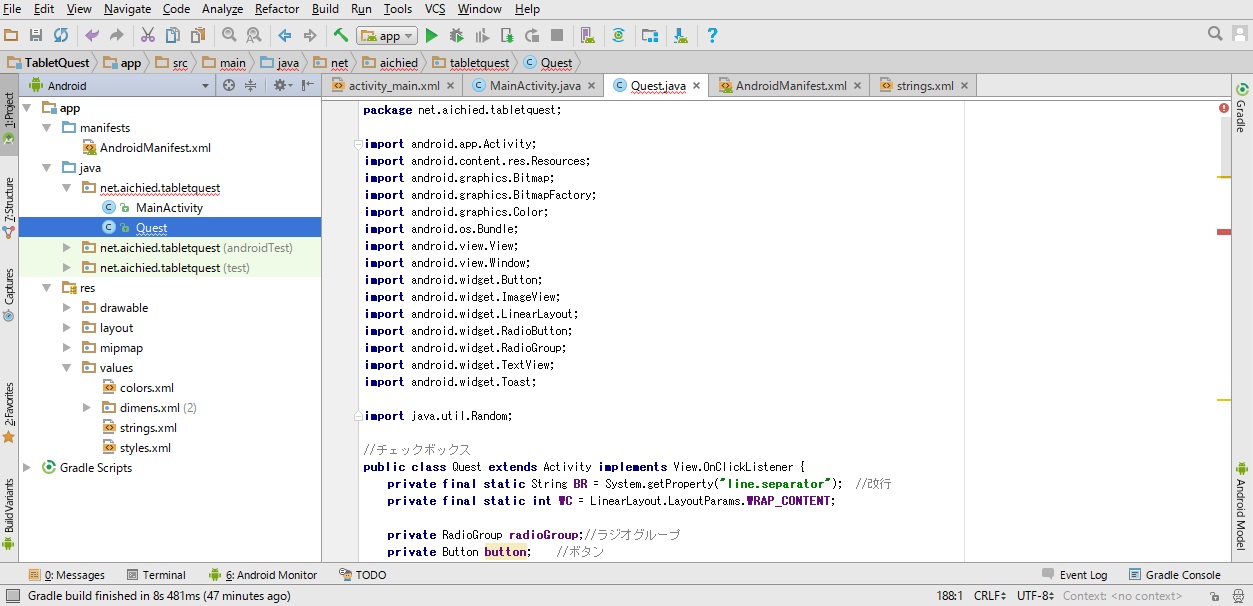
図11 ソースコード入力画面2
エ 「Quest.java」プログラム(説明用プログラム)
・1行目の「net.aichied.tabletquest」は,初期設定の最初に入力した「Application name」,「Company Dom」です。
・プログラムは,各種初期設定の後,問題用画像ファイルの読み込み,問題データ及び,選択肢データの設定をしています。
・問題用画像ファイル(ファイル名は(pic*)で,プログラム内の変数は(pic[*])),問題データ(que[*]),選択肢データ(sel[*][*])です。
・今回,問題データは同じですが,変えることができます。
・正解は,選択肢データ(sel[*][*])の先頭のデータ(sel[*][0])にして定義しています。
・ランダムに問題及び選択肢データの並びを設定し,タイトル,問題用画像,問題,選択肢を表示しています。
・ラジオボタンをクリックし,「決定」をクリックすると,正解または不正解が表示されます。
![]()
package net.aichied.tabletquest;
import android.app.Activity;
import android.content.res.Resources;
import android.graphics.Bitmap;
import android.graphics.BitmapFactory;
import android.graphics.Color;
import android.os.Bundle;
import android.view.View;
import android.view.Window;
import android.widget.Button;
import android.widget.ImageView;
import android.widget.LinearLayout;
import android.widget.RadioButton;
import android.widget.RadioGroup;
import android.widget.TextView;
import android.widget.Toast;
import java.util.Random;
//ラジオボタン
public class Quest extends Activity implements View.OnClickListener {
private final static String BR = System.getProperty("line.separator"); //改行
private final static int WC = LinearLayout.LayoutParams.WRAP_CONTENT;
private RadioGroup radioGroup;//ラジオグループ
private Button button; //ボタン
private Bitmap pic[] = new Bitmap[3]; //画像データ変数の定義
private String que[] = new String[3]; //問題データ変数の定義
private String sel[][] = new String[3][4]; //元の選択肢データ変数の定義
long seed = System.currentTimeMillis() + Runtime.getRuntime().freeMemory();
Random rnd = new Random(seed); //ランダム(乱数)の定義
int cor; //正解添字変数の定義
//アクティビティ起動時に呼ばれる
@Override
public void onCreate(Bundle bundle) {
super.onCreate(bundle);
requestWindowFeature(Window.FEATURE_NO_TITLE);
int i, j;
int ans[] = new int[4]; //表示用の選択肢データ変数の定義
// 写真データの読込
Resources r = getResources();
pic[0] = BitmapFactory.decodeResource(r, R.drawable. pic0);
pic[1] = BitmapFactory.decodeResource(r, R.drawable. pic1);
pic[2] = BitmapFactory.decodeResource(r, R.drawable. pic2);
//問題データ
que[0] = "写真の名称は?";
que[1] = "写真の名称は?";
que[2] = "写真の名称は?";
//選択肢データ
sel[0][0] = "配線用遮断器";
sel[0][1] = "モータブレーカ";
sel[0][2] = "漏電遮断器";
sel[0][3] = "交流電磁開閉器";
sel[1][0] = "リングスリーブ用圧着ペンチ";
sel[1][1] = "圧着端子用圧着ペンチ";
sel[1][2] = "ボルトクリッパ";
sel[1][3] = "ケーブルカッタ";
sel[2][0] = "アウトレットボックス";
sel[2][1] = "コンクリートボックス";
sel[2][2] = "スイッチボックス";
sel[2][3] = "露出スイッチボックス";
//レイアウトの生成
LinearLayout layout = new LinearLayout(this);
layout.setBackgroundColor(Color.WHITE);
layout.setOrientation(LinearLayout.VERTICAL);
setContentView(layout);
i = rnd.nextInt(3);
j = rnd.nextInt(4);
cor = 0;
ans[0] = j;
for (; ; ) {
j = rnd.nextInt(4);
if (ans[0] != j) break;
}
ans[1] = j;
if (j == 0) cor = 1;
for (; ; ) {
j = rnd.nextInt(4);
if (ans[0] != j && ans[1] != j) break;
}
ans[2] = j;
if (j == 0) cor = 2;
for (; ; ) {
j = rnd.nextInt(4);
if (ans[0] != j && ans[1] != j && ans[2] != j) break;
}
ans[3] = j;
if (j == 0) cor = 3;
TextView textView = new TextView(this);
textView.setText("第二種電気工事士試験用 鑑別問題");
textView.setTextSize(24);
textView.setTextColor(Color.rgb(0, 0, 0));
textView.setLayoutParams(new LinearLayout.LayoutParams(WC, WC));
layout.addView(textView);
Bitmap bitmap = pic[i] ;
ImageView imageView = new ImageView(this);
imageView.setImageBitmap(bitmap);
imageView.setLayoutParams(new LinearLayout.LayoutParams(600, 600));
layout.addView(imageView);
TextView textView2 = new TextView(this);
textView2.setText(que[i] + BR);
textView2.setTextSize(24);
textView2.setTextColor(Color.rgb(0, 0, 0));
textView2.setLayoutParams(new LinearLayout.LayoutParams(WC, WC));
layout.addView(textView2);
//ラジオボタン0の生成
RadioButton radio0 = new RadioButton(this);
radio0.setId(0);
radio0.setText(sel[i][ans[0]]);
radio0.setTextColor(Color.rgb(0, 0, 0));
//ラジオボタン1の生成
RadioButton radio1 = new RadioButton(this);
//noinspection ResourceType
radio1.setId(1);
radio1.setText(sel[i][ans[1]]);
radio1.setTextColor(Color.rgb(0, 0, 0));
//ラジオボタン2の生成
RadioButton radio2 = new RadioButton(this);
//noinspection ResourceType
radio2.setId(2);
radio2.setText(sel[i][ans[2]]);
radio2.setTextColor(Color.rgb(0, 0, 0));
//ラジオボタン3の生成
RadioButton radio3 = new RadioButton(this);
//noinspection ResourceType
radio3.setId(3);
radio3.setText(sel[i][ans[3]]);
radio3.setTextColor(Color.rgb(0, 0, 0));
//ラジオグループの生成(2)
radioGroup = new RadioGroup(this);
radioGroup.addView(radio0);
radioGroup.addView(radio1);
radioGroup.addView(radio2);
radioGroup.addView(radio3);
radioGroup.check(0);
radioGroup.setLayoutParams(new LinearLayout.LayoutParams(WC, WC));
layout.addView(radioGroup);
TextView textView3 = new TextView(this);
textView3.setText(BR);
layout.addView(textView3);
//ボタンの生成
button = new Button(this);
button.setText("決定");
button.setOnClickListener(this);
button.setLayoutParams(new LinearLayout.LayoutParams(WC, WC));
layout.addView(button);
}
//ボタンクリック時に呼ばれる
public void onClick(View v) {
if (radioGroup.getCheckedRadioButtonId() == cor)
Toast.makeText(this, "正解", Toast.LENGTH_SHORT).show();
else
Toast.makeText(this, "不正解", Toast.LENGTH_SHORT).show();
}
}
(5) マニュフェストファイルの入力
ア 機能面についての様々な情報を書いておくプログラム(ここでは,「AndroidManifest.xml」)です。
「¥app¥manifests」の下の「AndroidManifest.xml」をダブルクリックし,プログラムを入力します。
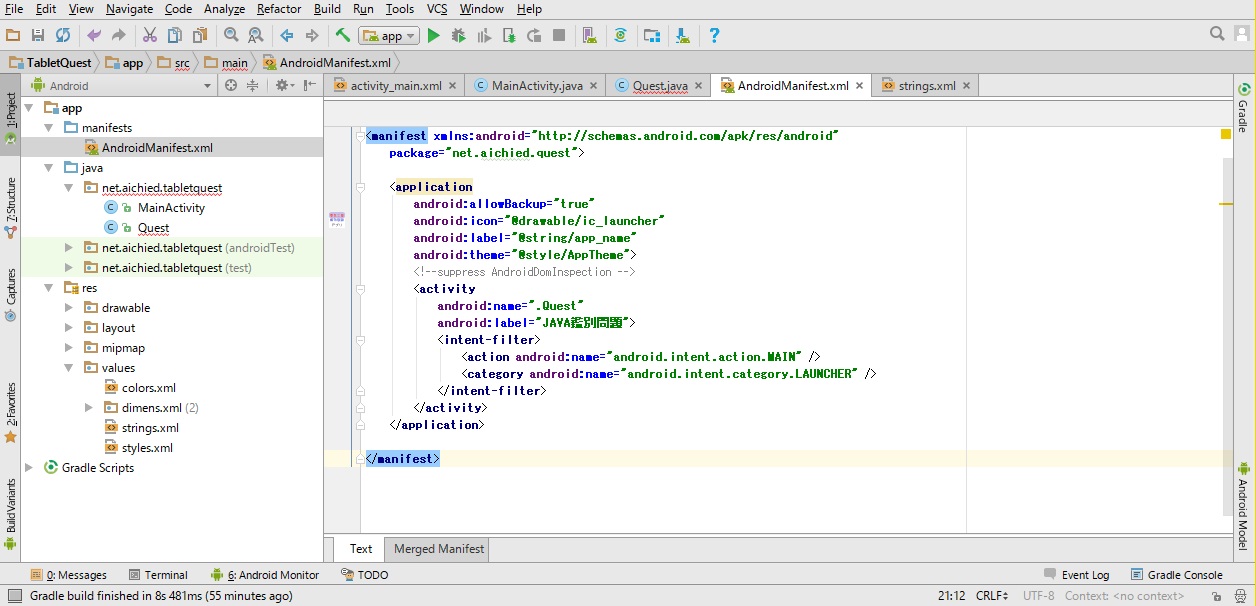
図12 マニュフェストファイル入力画面
![]()
<manifest xmlns:android="http://schemas.android.com/apk/res/android"
package="net.aichied.tabletquest">
<application
android:allowBackup="true"
android:icon="@drawable/ic_launcher"
android:label="@string/app_name"
android:theme="@style/AppTheme">
<!--suppress AndroidDomInspection -->
<activity
android:name=".Quest"
android:label="JAVA鑑別問題">
<intent-filter>
<action android:name="android.intent.action.MAIN"
/>>
<category android:name="android.intent.category.LAUNCHER"
/>
</intent-filter>
</activity>
</application>
</manifest>
イ 「AndroidManifest.xml」プログラム(説明用プログラム)設定時の注意点
「AndroidManifest.xml」ファイルのプログラムをダウンロードし,表示しようとしても,XMLファイルと認識されないため,正常に表示できません。
理由は,以下の宣言文が最初の1行目にないためです。ダウンロード用データは省略してあります。
<?xml version="1.0" encoding="utf-8"?>ダウンロードしたプログラムの先頭に,上の文字列をコピーして,プログラムの先頭行に追加(挿入)してください。
2行目の「net.aichied.tabletquest」は,初期設定の最初に入力した「Application name」,「Company Dom」です。
「android:icon=」でアイコンの画像ファイル名(ここでは「ic_launcher」)を設定します。
アイコンをコピーしたときのファイル名と合せてください。
「android:label=」では,実行用のファイル名(ここでは「JAVA鑑別問題」)」を設定します。
3 アプリケーションの実行
ア アプリケーションの実行実行のアイコンをクリックします。
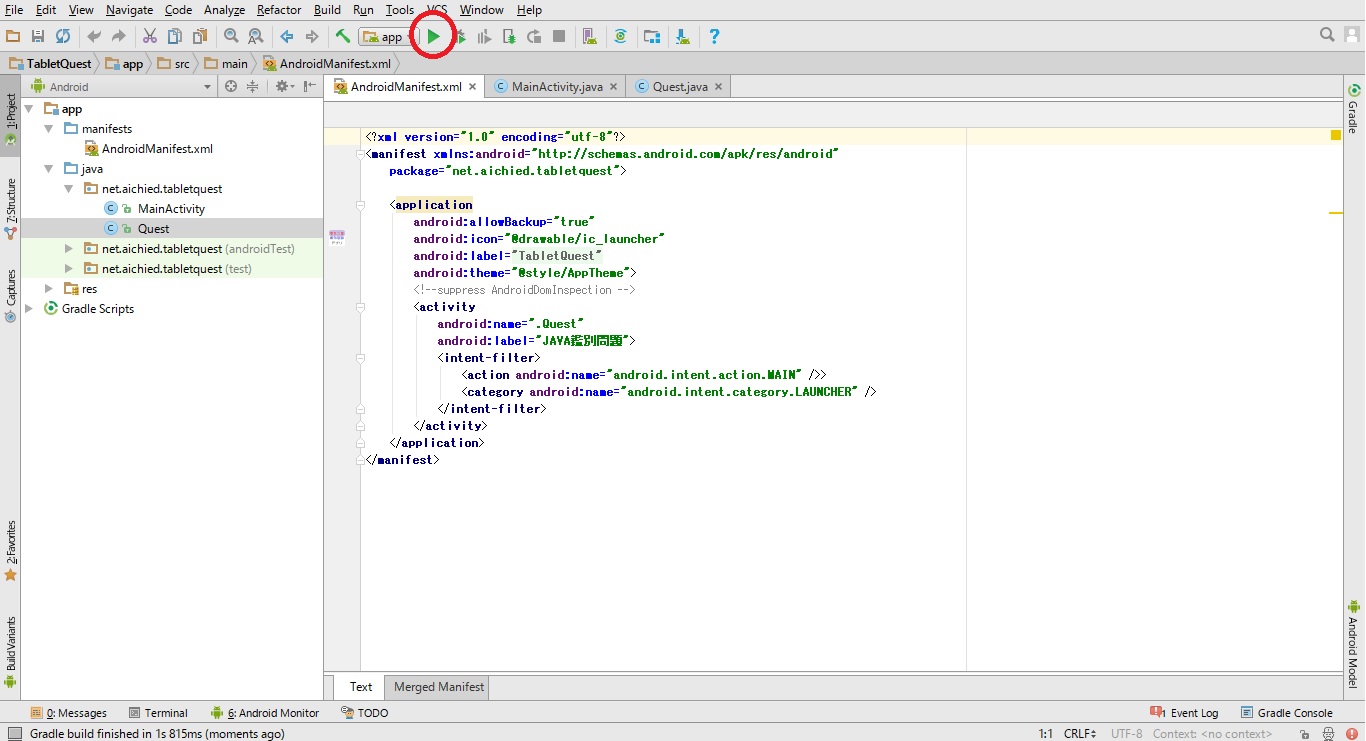
図13 アプリケーション実行画面1
イ 実行媒体の選択
実行する媒体を選びます(ここでは,「LENOVO EveryPad3」を選びました)。
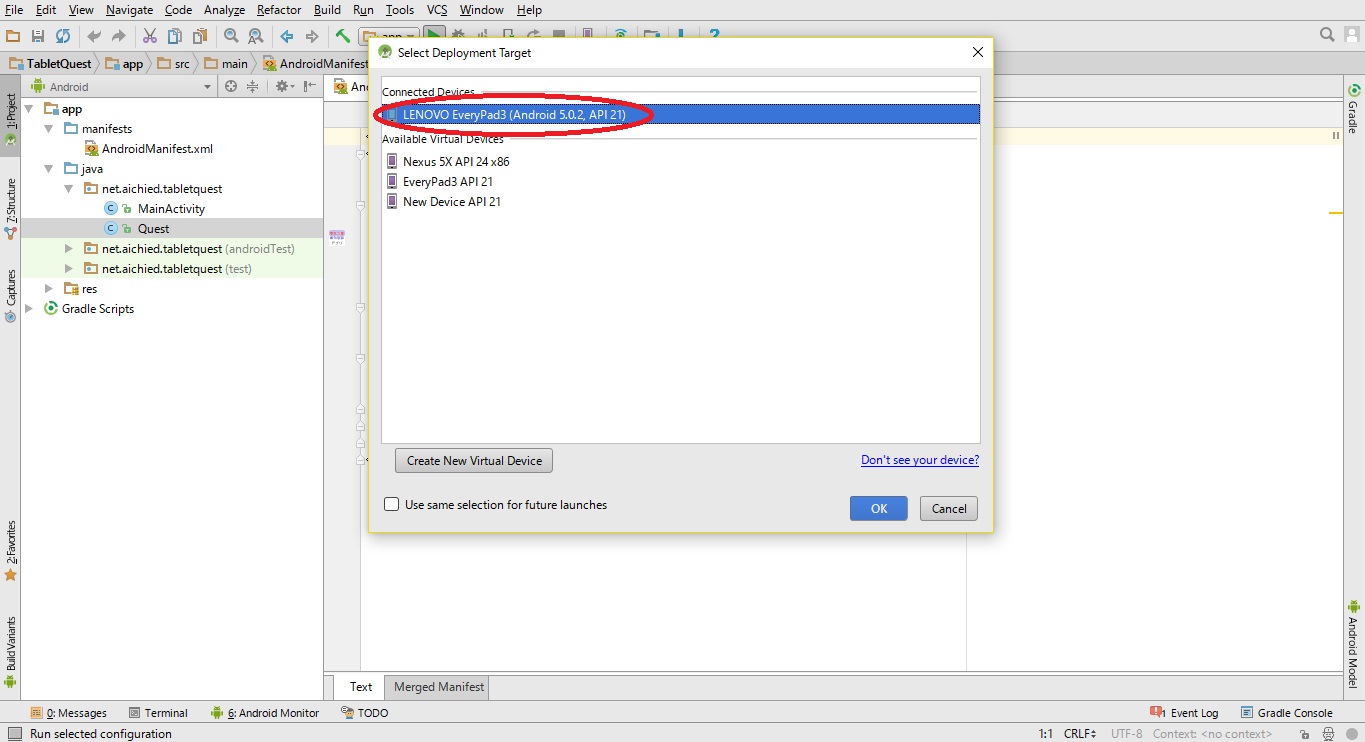
図14 アプリケーション実行画面2
ウ アイコン作成(タブレット画面の例)
タブレットの画面にアイコンが作成されます。
![]()
図15 スタート画面
エ 実行画面
アイコンをダブルクリックすると実行します。
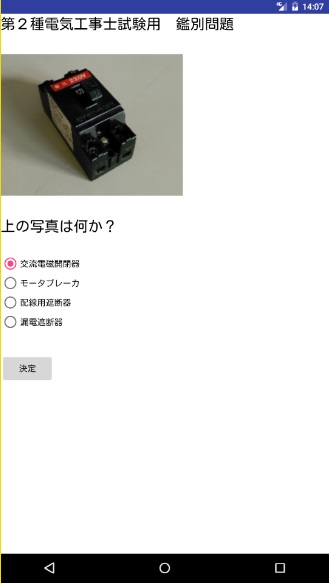
4 おわりに
XMLの特性上,HTMLでの表示が正常にできないため,「AndroidManifest.xml」プログラムが少し複雑になりました。それ以外では,ダウンロードしたプログラム及び,データはそのままコピーして使えます。
今回,例として示した問題は3問ですが,そのプログラムの中で,ドメイン名,ファイル名などの変更,問題数の増減などについて,ヒントになりそうな部分に色を付けて表示しましたので,参考にしてプログラムを改編してください。
このシステムの今後の課題は,問題,選択肢のデータベース化を図ることです。
問題数増減などの改編やデータベース化するすることを通してプログラム学習することがこのシステムのねらいです。今後の学校教育の中で活用していただけると幸いです。
5 参考文献
Android プログラミング バイブル SDK5/4[対応] 著者:布留川英一 発行所:ソシム株式会社これ1冊でできるAndroidStudioアプリ開発入門 著者:清水美樹 発行所:株式会社ソーテック社
JavaからはじめようAndroidプログラミング AndroidStudio対応版 著者:大津 真 発行所:株式会社インプレス
作ればわかる!Androidプログラミング第3版 著者:金宏和實 発行所:株式会社 翔泳社
Android は米国 Google 社の米国及び各国における商標または登録商標です。
Lenovo Every Pad3 はLenovo Corporation,ヤマダ電機の商標または登録商標です。
その他,本コンテンツに掲載されているすべてのブランド名と製品名,商標および登録商標はそれぞれの帰属者の所有物です。本コンテンツでは©,®,TM などは明記してありません。